
Getting a clean mic sound across your whole system
This guide is a minimalistan approach to usingclean OBSup tothe processsignal audiocoming forfrom bothyour streamingmic andacross voiceyour callswhole using Discord (or similar software).system. It uses OBSEqualizerAPO to take in a raw mic signal,signal and process it using Reaper's free audio processing tools, and outputs to a virtual audio device that is then used in place of the mic for recording.tools.
At the end of this guide you will have noise-reduced (i.e. no background hums or hisses), gated (i.e. no background noise when you're quiet), and compressed (i.e. no wild swings in volume) audio on-streamfrom your mic in all Windows applications.
Note that this approach requires more maintenance and ongoing attention than my guide for doing this in DiscordOBS. calls.You will need to return to these steps if you update your drivers, and some of the buttons will crash the application and may lead to your audio simply not working. The typical fix is to uninstall and re-install EqualizerAPO, but please be warned, and use my other guide if any of that makes you uncomfortable.
If you have feedback, you can comment down below (requires an account, or to sign-in with Discord) or reach out on Twitter or Discord.
Pre-requisites
WorkingYou will need to download and installOBS setupReaPlugs- You will need to download
Virtual Audio CableEqualizerAPO(or-VirtualinstallationAudiostepsCableareA+B/C+D if you already use Virtual Audio Cable)below - You will need to download a noise reduction VST plugin such as
ReaPlugsone of the rnnoise builds. Installation steps using that plugin are below, but you can use any VST noise reducer. - Turn off any upstream audio processing (anything that gates/compresses/etc. your signal in software or hardware)
- Your microphone connected and gain/input level set to a level you're comfortable with. Gain should be set not clip or buzz when you get loud.
Restrictions
Installing
Passing Mic from OBS to DiscordEqualizerAPO
At the end of this section, you will have unprocessedEqualizerAPO audioprocessing goingthe feed from theyour mic to OBS and then into Discord.microphone.
OBS SettingsInstallation
In File / Settings / Audio - configure your Monitoring Device to use your Virtual Cable input.
EqualizerAPO
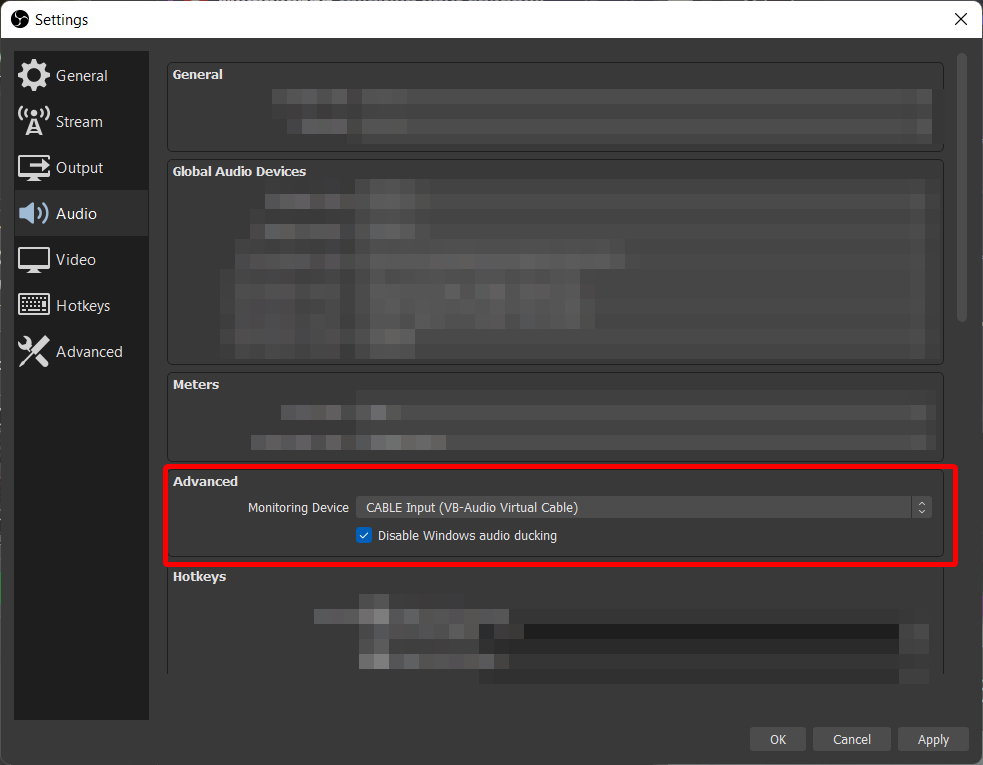
Choose 'OK'.
InRun the Editinstaller /for AdvancedEqualizerAPO. AudioDuring Propertiesthe - configure your microphone to be monitored both Monitor and Output.
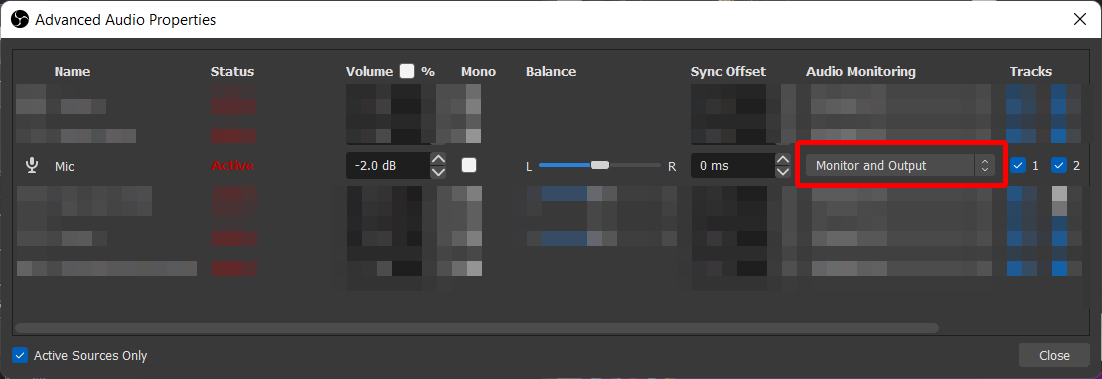
Set all other Audio Monitoring settings to "Monitor Off".
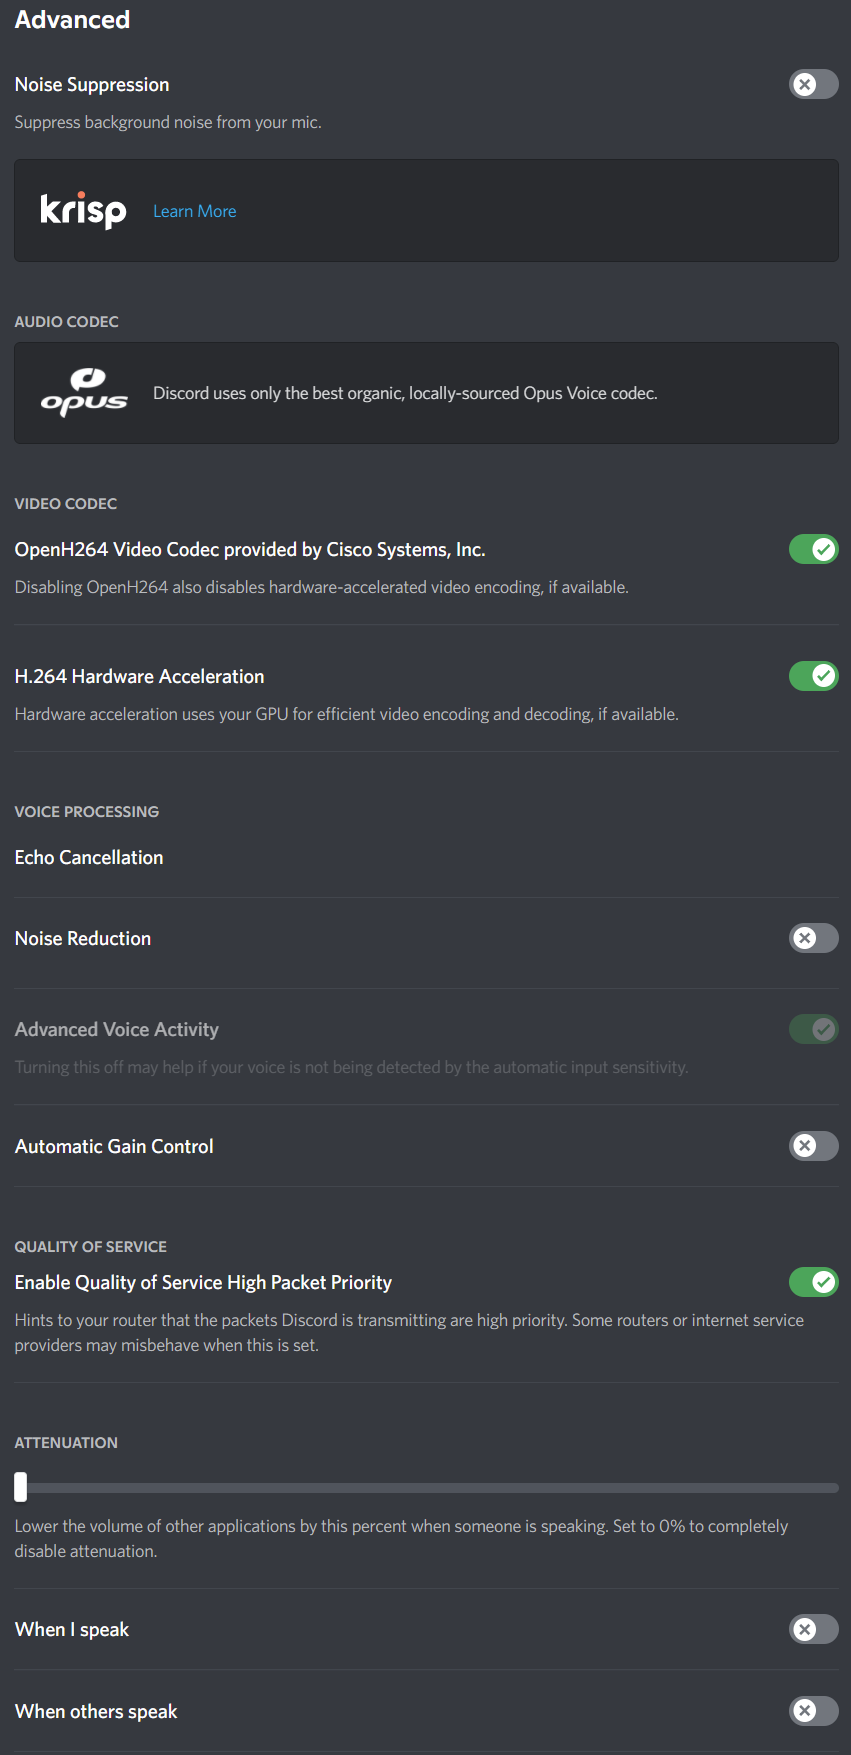
Discord Settings
Open Discord and go to your settings / Voice & Video. Change Input Device to CABLE Output (or whichever corresponds to Output you chose in OBS).
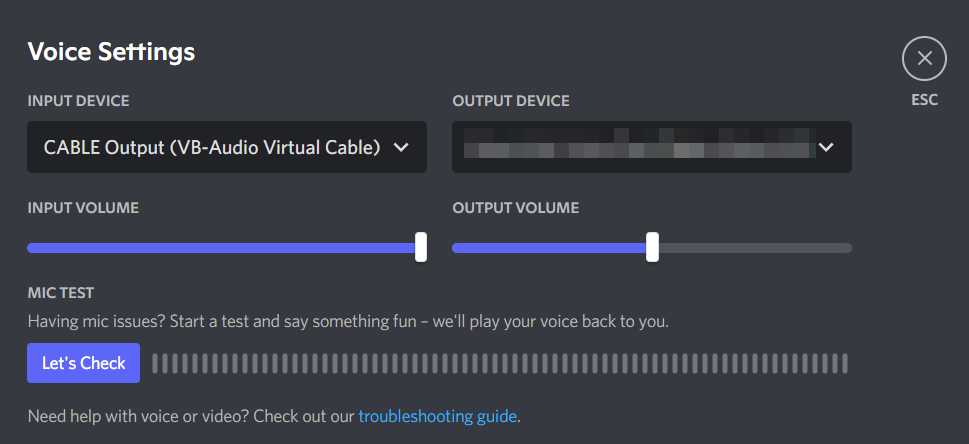
Scroll down in these settings and turn off all Discord processing -process, you will be doingpresented Noisewith Suppression/Reductiona screen that looks like this one (your number of devices will vary):
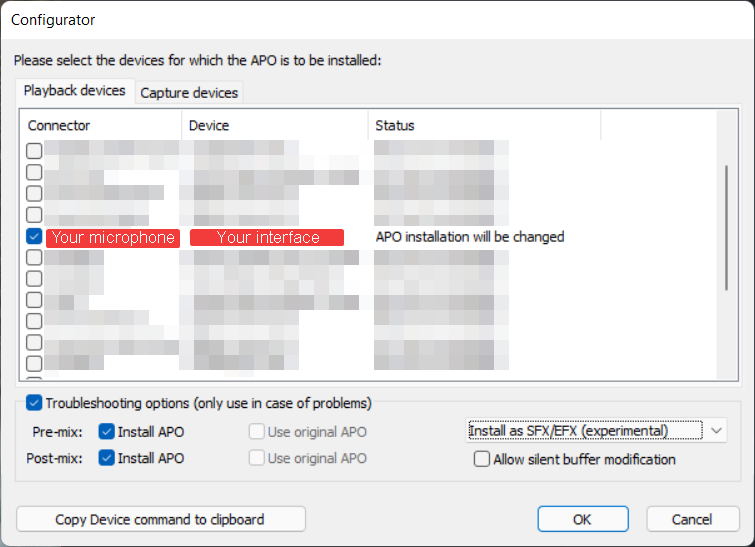
Tick the box next to your microphone input. Tick the box for Troubleshooting options and Gainchoose "Install as SFX/EFX (experimental)". Click OK and restart your machine.
You may need to experiment with the Troubleshooting options on/off if you get crackling, no audio, etc. - these are just the settings that generally work.
If you ever have to return to this screen, you will find it in OBS.your start menu under EqualizerAPO as 'Configurator':

Noise Reduction
You maycan use any noise reduction plugin you want, so long as it's available as a VST. If you have a noise reduction plugin you want to turnuse, onand Echoyou Cancellationknow where it is, you can skip this step.
Download the file windows_rnnoise_bin_x64.zip from https://github.com/werman/noise-suppression-for-voice/releases (or adjust if you are using speakers32-bit orwindows, headphonesbut that is unlikely). Extract that file somewhere.
With the extracted files, there is a folder 'bin' and within that 'leak'vst'. Copy librnnoise_vst.dll from that folder into yourC:\Program mic.
Makethat surefolder OBS is running (does not needexist, to be streaming or recording), that your mic is unmuted and shows in the mixer in OBS, and choose 'Let's Check' in Discord.
Save your settings - at this pointconfirm you have OBSReaPlugs passinginstalled audio(see fromPre-Requisites your mic into Discord.above).
Audio Processing
Monitoring
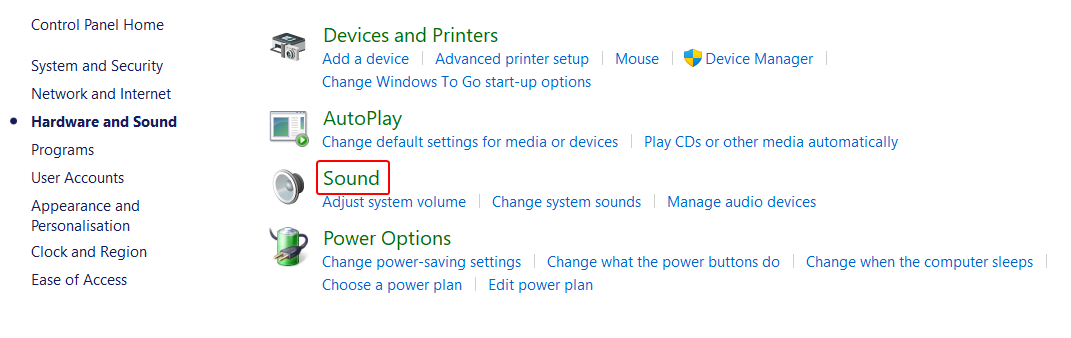
UseYou thecan Discorduse 'Let'syour Check'windows functionsound settings to listen to your audiomic -to see how the sound is affected. To do that, open your classic Control Panel:

Open 'Sound':
In the Recording tab, double click your mic and choose 'Listen to this device' from the 'Listen' tab.
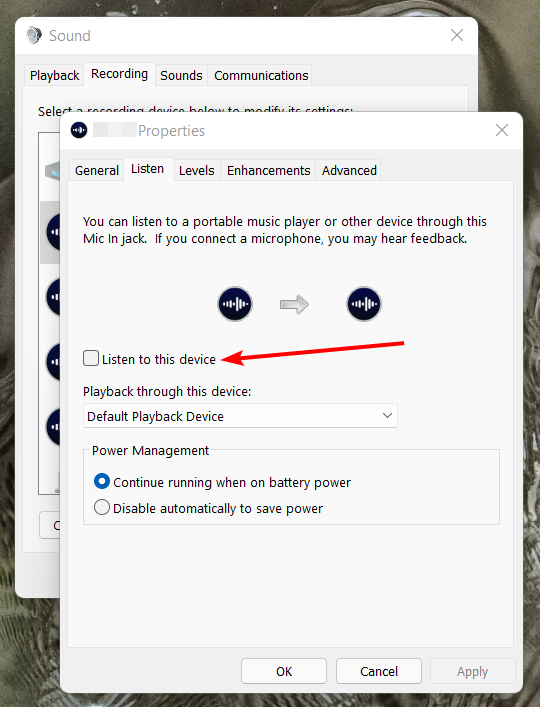
Remember this location. Since the processing will take time, it will givedelay your voice while listening. This can be incredibly distracting, so you awill representationwant ofto whattoggle this on and off throughout the process.
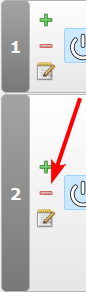
Adding plugins

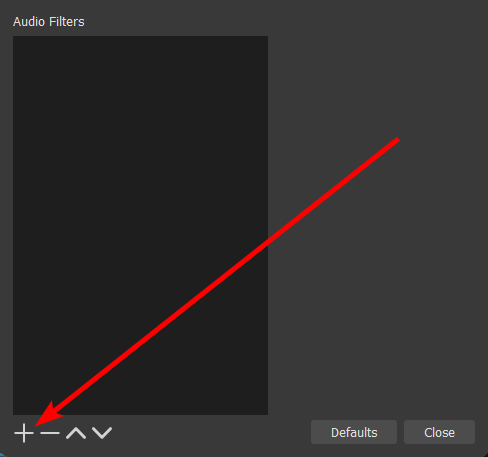
Open it. You will want to others.remove all the default entries with the red '-' buttons:
OBS Filters
ReturnYou towill OBS,be andleft with an empty pane:
Make sure your device in the mixertop panel,left opencorner Filtersis set to your microphone.
Click the green + button and choose 'Plugins' / 'VST plugin':
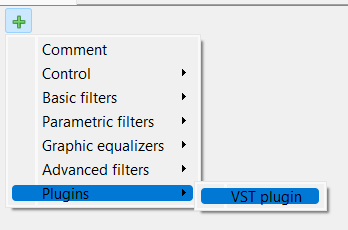
Then follow the blue folder icon next to 'VST plugin', and locate the noise reduction plugin you downloaded earlier. Repeat this step from the Settings'+' menubutton for your'C:\Program Mic.Files\VSTPlugins\ReaPlugs\reagate-standalone.dll', and 'C:\Program Files\VSTPlugins\ReaPlugs\reacomp-standalone.dll'. Your window will now look like:
Noise Suppression
Noise suppression will remove repetitive noises, low hums, etc. - fans, electrical hums, etc. Click the Add button, and choose "Noise Suppression".
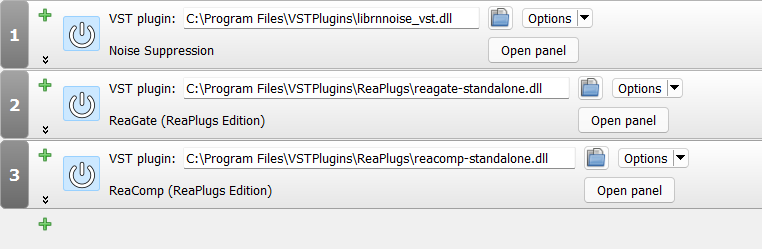
The defaultsorder areis likelyimportant!
First fine,- leaveNoise themreduction
Second as-is.- 'ReaGate'
Third - 'ReaComp'
You do not need to configure the noise reduction plugin. Clicking 'Open panel' may crash your application.
Noise Gate
The noise gate will silence all output when your audio signal drops below a certain level, which will result in silence in the signal when your space is quiet such as when you move around without talking.
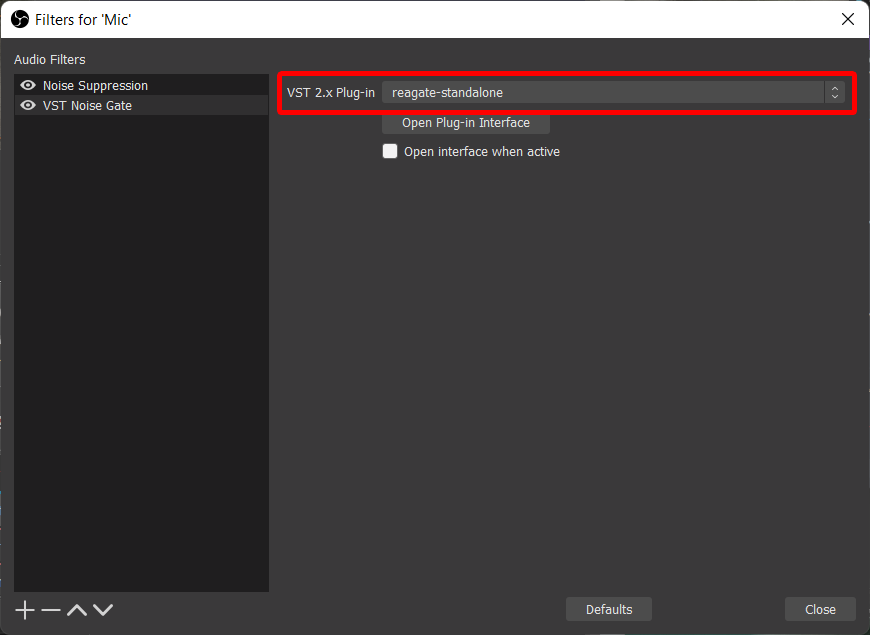
Choose the same Add button as above and choose "VST 2.x Plug-in" not Noise Gate. Change the name to "VST Noise Gate". Choose 'reagate-standalone' from the VST 2.x Plug-in drop down.
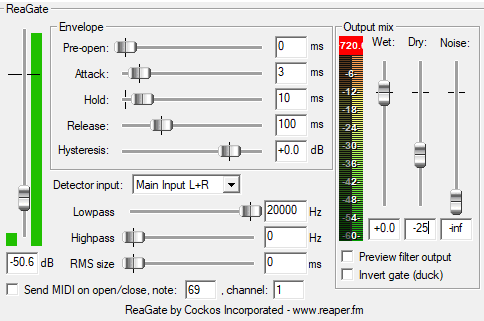
Click 'Open Plug-InPanel' Interface'.next to the ReaGate VST Plugin. Configure your settings per the below:
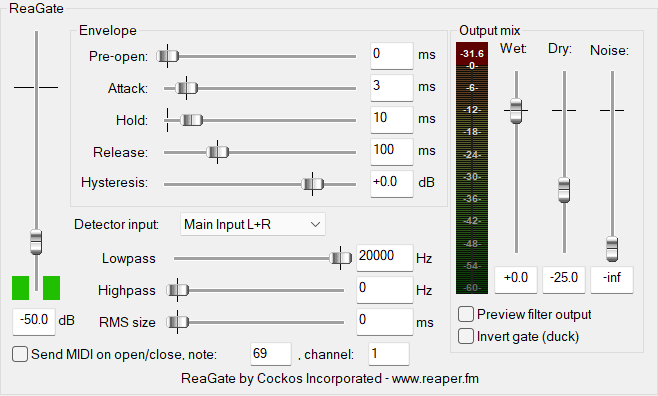
While sitting as quietly as you can, move the Threshold slider on the left to just above the highest point the green bars reach. When you speak quietly, the green bars need to be above the Threshold level.
The important settings for changing the sound are:
Pre-open - set this to zero for anything live. Anything above zero will delay the signal so the gate can open 'before' you speak, but for live this is not worth using.
Attack - this is the amount of time before the gate lets noise through. Increase this if your space has clicks/pops/etc. that may cause the gate to open briefly, but this may cut off the first part of your sentences if it is too high. So keep it as low as possible.
Hold - this is the minimum amount of time the gate stays open, set it to around the time it takes to say a short word like 'the' or 'a'. This will ensure you don't get cut off by the gate.
Release - this is the amount of time that the gate will spend 'turning down the volume' to zero as it closes. Set this to a long enough time that you can't hear the gate opening and closing.
To the right, Dry is the amount of the un-gated signal that will be mixed it. Set this to around -25 to allow some background noise through - this will make the sound a bit more natural.
Close the window.
Compressor
The compressor will take loud noises and 'turn the volume down'. This will allow you to turn the overall signal up so that quieter sounds can be heard without loud noises causes a significant increase in volume and requiring your audience to change volume as you stream.
Choose the same Add button as above and choose "VST 2.x Plug-in" not Compressor. Change the name to "VST Compressor". Choose 'reacomp-standalone' from the VST 2.x Plug-in drop down.
Click 'Open Plug-InPanel' Interface'next to the ReaComp VST Plugin. . Configure your settings per the below:
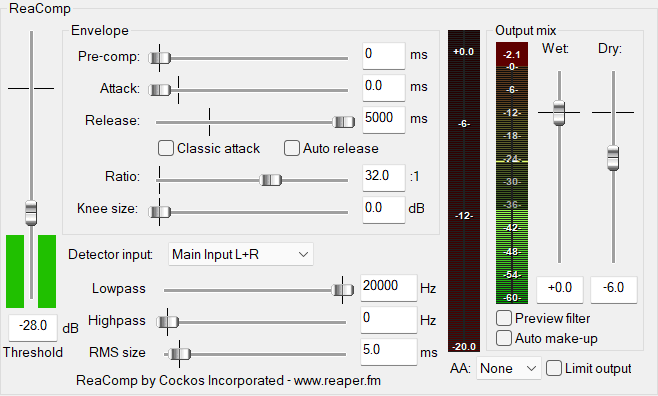
This compressor set up is quite different to pre-recorded content - the goal is to have a compressor 'panic' and turn the noise down as rapidly as possible and then turn it back up slowly.
While talking at a normal volume, move the Threshold slider to approximately the average point the green bars reach. Because the compressor works by turning the volume down, you will need to add gain to make the volume more correct. Speak loudly, and move Wet up until the output meter (green bars with numbers over them) is hitting around -4 when you are as loud as your typical loud noises.
The important settings are:
Pre-open - set this to zero for anything live. Anything above zero will delay the signal so the compressor can turn the volume down 'before' you speak, but for live this is not worth using.
Attack - this is the amount of time before the compressor acts. Keep it as low as possible so that the compressor acts as early as possible, but you may want to increase this if you want the volume to briefly spike before being compressed.
Release - this is the amount of time the compressor will take to 'turn the volume back up'. Set this higher if you tend to stay loud for a few sentences, set this lower if loudness is more transient.
Ratio - this is the amount that the volume is 'turned down'. At 2:1, noise above the threshold will be cut in half. At 4:1 it will be a quarter, etc. At high numbers (above 8:1 or so), yelling will stay at about the same volume as normal speaking which is usually the desired outcome.
To the right, Dry is the amount of the un-compressed signal that will be mixed it. Set this to around -6 to allow some background noise through - this will make the sound a bit more natural.
You will need to spend some time getting Threshold, Ratio and Wet correct. You want to see very small movement in the tall red bar (next to Output Mix) at normal talking, no movement in that bar when talking softly and large movements when you yell. Output Mix should never exceed 0 (you can click on the number at the very top of the Output Mix bar to reset it, it will show you a 'peak' number):
- Adjust Wet down and Threshold up in small increments if you are getting an Output mix above 0, until it peaks around -2.
- Adjust Wet up and Threshold down in small increments if you are getting an Output mix that's too quiet, again until it peaks around -2.
Final Settings
If your overall volume is low, get the volume coming out of the Compressor higher by adjusting up Wet at the Compressor stage. You may need to increase your threshold or ratio to make sure you don't clip above zero.
InAt OBS,this stage, anything that uses your Micmicrophone volumewill shouldbe exceed all other audio sources. Set your Mic volume tousing the max level and adjust your other sources down to compensate. Your Mic analyser should be in the upper portion of the Red part of the bar. The compressor will keep the volume even, so you want to be loud on the outputprocessed signal.

If you have everything sounding ideal but still hit the top of the OBS bar from time-to-time, you can turn down the Mic volume in the OBS mixer. Note it should peak above all your other sources. Adjust your other sources down to compensate.
This slider is your master mic volume control. You should set it lower than 0 to give yourself gain play with if you need to dial yourself up on-the-fly. Note that you should balance this for your stream output, and you can turn down your volume in Discord if required.
Troubleshooting
VeryProcessing highhas outputstopped appearingworking!
Driver updates will remove the EqualizerAPO installation. Returning to the Configurator and re-installing on oneyour channel
If you have a stereo sound source, but you are only using one channeldevice (i.e.see mostInstallation microphones),above) youwill maytypically find thatfix the right channel is pegged to 100%, even though OBS shows no input in the main interface.problem.
I
Weget fixcrackling/popping
this by ignoring Main Input R:
- Return to
Advanced Audio Properties (thecog icon next to your mic in the OBS main screen, see OBS settings above),Configurator andticktry'Mono'otherbyTroubleshootingyouroptionsMic(includingdevice.
turning off Troubleshooting). - In the
gatemainsettings,windowifof thefalseConfigurationsignalEditor,hasn'tyoudisappeared,maychangealso'DetectorwantInput'to try setting the Channel Configuration to 'Mainmono',InputwhichL'reduced processing work In the compressor settings, again if the false signal hasn't disappeared, change 'Detector Input' to 'Main Input L'
- Return to